NADEA
NADEA.

序言:跨域资源共享向来都是热门的需求,使用CORS可以帮助我们快速实现跨域访问,只需在服务端进行授权即可,无需在前端添加额外设置,比传统的JSONP跨域更安全和便捷。
简单来说,CORS是一种访问机制,英文全称是Cross-Origin Resource Sharing,即我们常说的跨域资源共享,通过在服务器端设置响应头,把发起跨域的原始域名添加到Access-Control-Allow-Origin 即可。
CORS实现跨域访问并不是一蹴而就的,需要借助浏览器的支持,从原理题图我们可以清楚看到,简单的请求(通常指GET/POST/HEAD方式,并没有去增加额外的请求头信息)直接创建了跨域请求的XHR对象,而复杂的请求则要求先发送一个"预检"请求,待服务器批准后才能真正发起跨域访问请求。
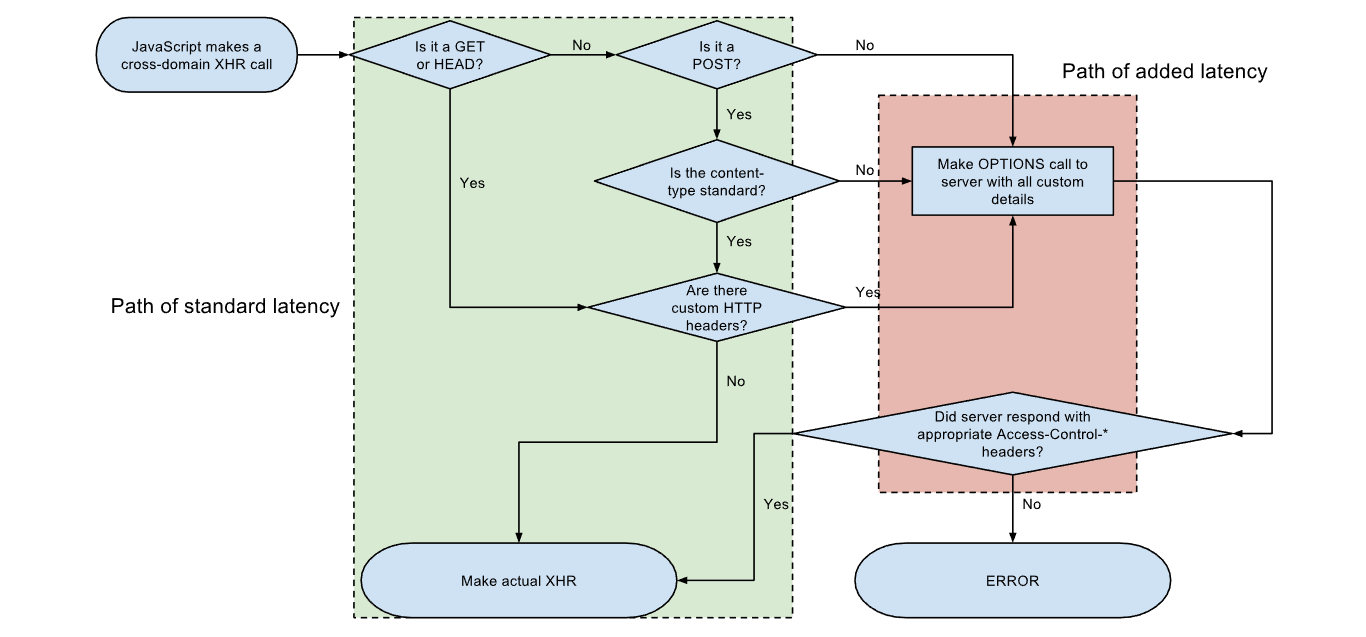
来自维基百科
根据官方文档W3C规范-CORS 的描述,目前CORS使用了如下头部信息:
温馨提示:
Request Headers无需人为干预,因为浏览器会自动识别跨域请求并添加对应的请求头。
Origin 表示发起跨域请求的原始域。
Access-Control-Request-Method 表示发起跨域请求的方式,例如GET/POST。
Access-Control-Request-Headers表示发起跨域请求的额外头信息。
温馨提示:
Response Headers需要人为干预,通过设置响应头以帮助服务器资源进行跨域授权,例如允许哪些原始域进行跨域请求,是否允许响应信息携带Cookie等认证信息。
Access-Control-Allow-Origin 表示允许哪些原始域进行跨域访问。
Access-Control-Allow-Credentials表示是否允许客户端获取用户凭据。
使用场景:例如现在需要登录系统后才能发起跨域请求,并且要附带Cookie信息给服务器。则必须具备两个条件:1. 浏览器端:发送AJAX请求前需设置通信对象XHR的withCredentials 属性为true。 2.服务器端:设置Access-Control-Allow-Credentials为true。两个条件缺一不可,否则即使服务器同意发送Cookie,浏览器也无法获取。正确姿势如下:
$.ajax({ url: 'localhost:8080', xhrFields: { withCredentials: true //表示发起跨域访问并要求携带Cookie等认证信息 }, success: function (r) { console.log(r) } }); 有好奇的小伙伴可能会问为什么在W3C手册中找不到跨域属性xhrFields的描述,因为该属性并不是通信对象XHR的默认属性,而是自定义属性,所以在jQuery Ajax 参考手册 中并没有明确注明,但我们可以在jQuery源码中找到这段蛛丝马迹,那么整体思路就很清晰了。
// Cross domain only allowed if supported through XMLHttpRequest if ( support.cors || xhrSupported && !options.crossDomain ) { return { send: function( headers, complete ) { var i, xhr = options.xhr(); xhr.open( options.type, options.url, options.async, options.username, options.password ); // Apply custom fields if provided if ( options.xhrFields ) { for ( i in options.xhrFields ) { xhr[ i ] = options.xhrFields[ i ]; } } ... } Access-Control-Allow-Methods 表示允许哪些跨域请求的提交方式。(例如GET/POST)
Access-Control-Allow-Headers 表示跨域请求的头部的允许范围。
Access-Control-Expose-Headers 表示允许暴露哪些头部信息给客户端。
使用说明:基于安全考虑,如果没有设置额外的暴露,跨域的通信对象XMLHttpRequest只能获取标准的头部信息。
Access-Control-Max-Age 表示预检请求 [Preflight Request] 的最大缓存时间。
注:CorsFilter / WebMvcConfigurer / @CrossOrigin 需要SpringMVC 4.2 以上的版本才支持,对应SpringBoot 1.3 版本以上都支持这些CORS特性。不过,使用SpringMVC4.2 以下版本的小伙伴也不用慌,直接使用方式4通过手工添加响应头来授权CORS跨域访问也是可以的。附:在SpringBoot 1.2.8 + SpringMVC 4.1.9 亲测成功。
注:方式1和方式2属于全局CORS配置,方式3和方式4属于局部CORS配置。如果使用了局部跨域是会覆盖全局跨域的规则,所以可以通过@CrossOrigin注解来进行细粒度更高的跨域资源控制。
在任意配置类,返回一个新的CorsFilter Bean,并添加映射路径和具体的CORS配置信息。
package com.hehe.yyweb.config; @Configuration public class GlobalCorsConfig { @Bean public CorsFilter corsFilter() { //1.添加CORS配置信息 CorsConfiguration config = new CorsConfiguration(); //放行哪些原始域 config.addAllowedOrigin("*"); //是否发送Cookie信息 config.setAllowCredentials(true); //放行哪些原始域(请求方式) config.addAllowedMethod("*"); //放行哪些原始域(头部信息) config.addAllowedHeader("*"); //暴露哪些头部信息(因为跨域访问默认不能获取全部头部信息) config.addExposedHeader("*"); //2.添加映射路径 UrlBasedCorsConfigurationSource configSource = new UrlBasedCorsConfigurationSource(); configSource.registerCorsConfiguration("/**", config); //3.返回新的CorsFilter. return new CorsFilter(configSource); } } 在任意配置类,返回一个新的WebMvcConfigurer Bean,并重写其提供的跨域请求处理的接口,目的是添加映射路径和具体的CORS配置信息。
package com.hehe.yyweb.config; @Configuration public class GlobalCorsConfig { @Bean public WebMvcConfigurer corsConfigurer() { return new WebMvcConfigurer() { @Override //重写父类提供的跨域请求处理的接口 public void addCorsMappings(CorsRegistry registry) { //添加映射路径 registry.addMapping("/**") //放行哪些原始域 .allowedOrigins("*") //是否发送Cookie信息 .allowCredentials(true) //放行哪些原始域(请求方式) .allowedMethods("GET","POST", "PUT", "DELETE") //放行哪些原始域(头部信息) .allowedHeaders("*") //暴露哪些头部信息(因为跨域访问默认不能获取全部头部信息) .exposedHeaders("Header1", "Header2"); } }; } } 在方法上(@RequestMapping)使用注解 @CrossOrigin :
@RequestMapping("/hello") @ResponseBody @CrossOrigin("http://localhost:8080") public String index( ){ return "Hello World"; } 或者在控制器(@Controller)上使用注解 @CrossOrigin :
@Controller @CrossOrigin(origins = "http://xx-domain.com", maxAge = 3600) public class AccountController { @RequestMapping("/hello") @ResponseBody public String index( ){ return "Hello World"; } } 使用HttpServletResponse对象添加响应头(Access-Control-Allow-Origin)来授权原始域,这里Origin的值也可以设置为"*" ,表示全部放行。
@RequestMapping("/hello") @ResponseBody public String index(HttpServletResponse response){ response.addHeader("Access-Control-Allow-Origin", "http://localhost:8080"); return "Hello World"; } 首先使用 Spring Initializr 快速构建一个Maven工程,什么都不用改,在static目录下,添加一个页面:index.html 来模拟跨域访问。目标地址: http://localhost:8090/hello
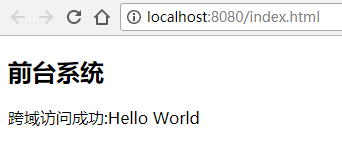
<!DOCTYPE html> <html lang="en"> <head> <meta charset="UTF-8"/> <title>Page Index</title> </head> <body> <h2>前台系统</h2> <p id="info"></p> </body> <script src="webjars/jquery/3.2.1/jquery.js"></script> <script> $.ajax({ url: 'http://localhost:8090/hello', type: "POST", xhrFields: { withCredentials: true //允许跨域认证 }, success: function (data) { $("#info").html("跨域访问成功:"+data); }, error: function (data) { $("#info").html("跨域失败!!"); } }) </script> </html> 然后创建另一个工程,在Root Package添加Config目录并创建配置类来开启全局CORS。
package com.hehe.yyweb.config; @Configuration public class GlobalCorsConfig { @Bean public WebMvcConfigurer corsConfigurer() { return new WebMvcConfigurer() { @Override public void addCorsMappings(CorsRegistry registry) { registry.addMapping("/**"); } }; } } 接着,简单编写一个Rest接口 ,并指定应用端口为8090。
package com.hehe.yyweb; @SpringBootApplication @RestController public class YyWebApplication { @Bean public TomcatServletWebServerFactory tomcat() { TomcatServletWebServerFactory tomcatFactory = new TomcatServletWebServerFactory(); tomcatFactory.setPort(8090); //默认启动8090端口 return tomcatFactory; } @RequestMapping("/hello") public String index() { return "Hello World"; } public static void main(String[] args) { SpringApplication.run(YyWebApplication.class, args); } } 最后分别启动两个应用,然后在浏览器访问:http://localhost:8080/index.html ,可以正常接收JSON数据,说明跨域访问成功!!
尝试把全局CORS关闭,或者没有单独在方法或类上授权跨域,再次访问:http://localhost:8080/index.html 时会看到跨域请求失败!!

专题阅读:《SpringBoot 布道系列》
官方文档:W3C规范-CORS
传统文档:SpringMVC-CORS 使用手册
推荐阅读:跨域资源共享 CORS 详解 - 阮一峰
原文链接:http://www.jianshu.com/p/477e7eaa6c2f
版权声明: 转载请注明出处 by yizhiwazi
作者:一只袜子
链接:https://www.jianshu.com/p/477e7eaa6c2f
来源:简书
著作权归作者所有。商业转载请联系作者获得授权,非商业转载请注明出处。
下一个:你确定你会用Enum枚举了?
